Configure Azure AD SAML SSO with Cisco ASA AnyConnect VPN
11th February 2020As the "cloud only" model continues to grow, we are starting to see an influx of environments where a legacy on-premise Active Directory domain does not exist. Whether this is your case, or you are just looking to utilize modern web based authentication - then this article is for you. Although i strongly believe that Azure AD is NOT a replacement for an on premise domain, Microsoft's continued development has proven it a viable solution for organizations of many sizes. I had some difficulty completing this setup process on ASDM, so this article will cover the steps to complete via SSH/CLI.
What You Need
1. Cisco ASA device with SSH/ASDM access
2. Azure AD (Free version will work, but paid versions are required in order to enforce conditional access policies like MFA)
3. Existing VPN tunnel group (Make sure the tunnel group does not have spaces in the name otherwise you may run into issues accessing the metadata in section 3)
Section 1 : Azure AD Configuration
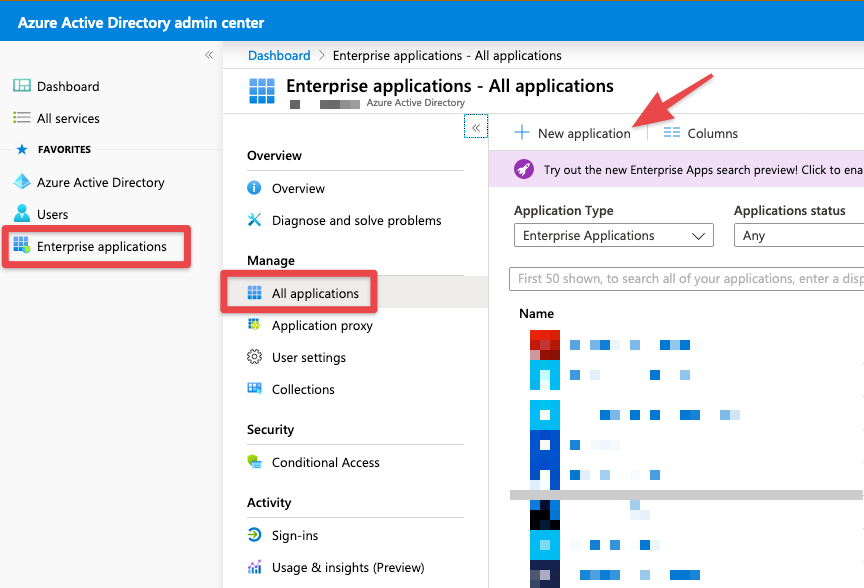
- Login to the Azure AD portal (https://aad.portal.azure.com)
- Browse to Enterprise Applications > All Applications > + New Application
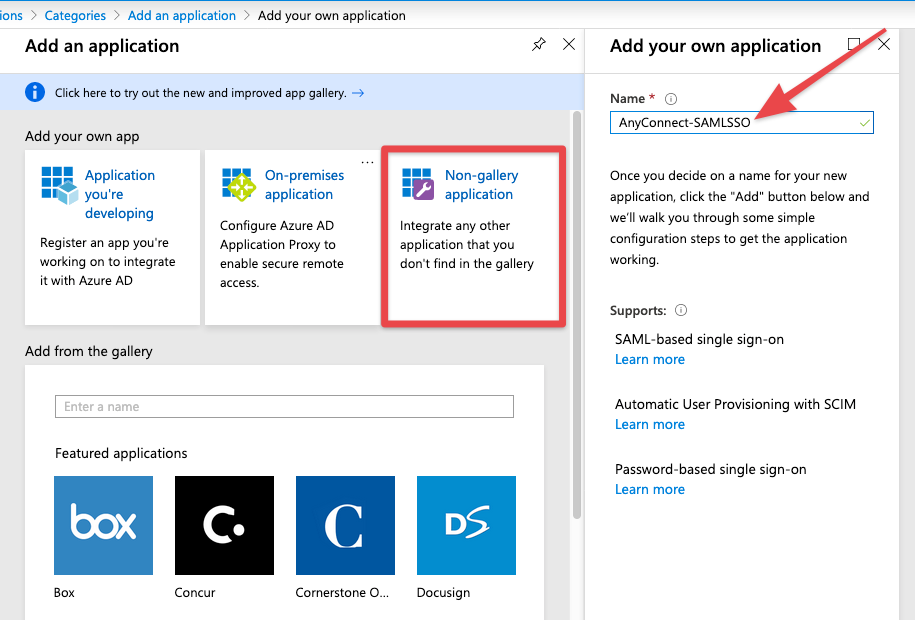
- Under the "Add an Application" menu, select "Non-gallery application" and enter in a name for your application. In this example i have chose "AnyConnect-SAMLSSO". Once named press the blue "Add" button at the bottom of the blade.
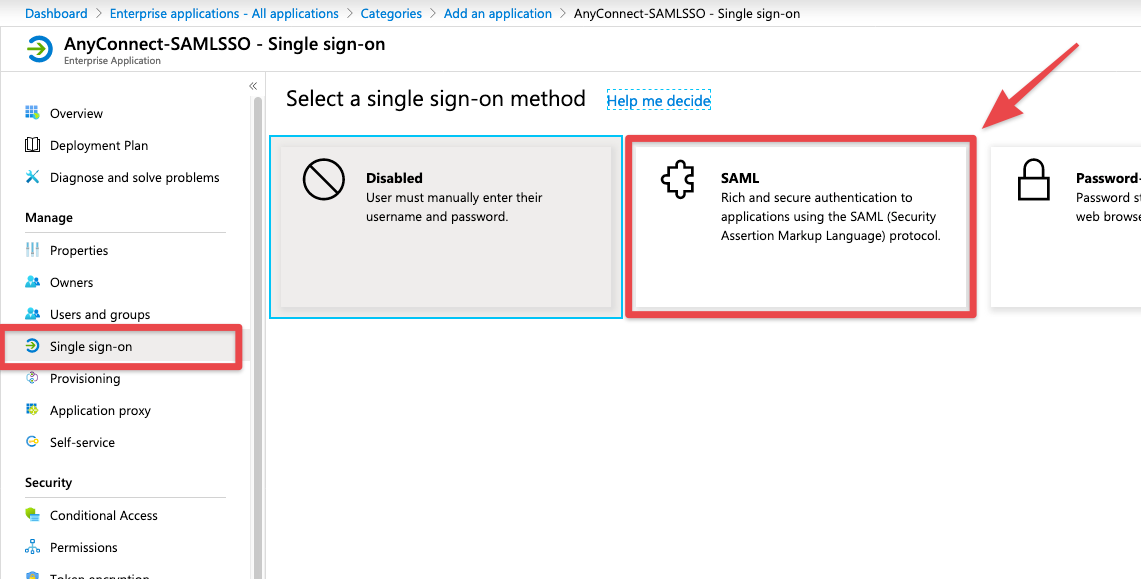
- Once the application has been created, browse to "Single sign-on" and then select "SAML".
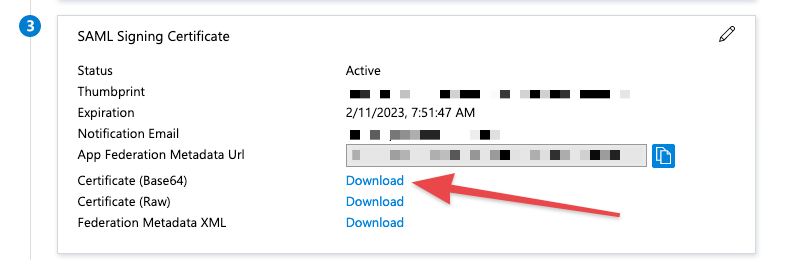
- Once the SAML configuration page loads, we will need to download the Base64 certificate from box 3.
- From box 4, Record 1. Login URL, 2. Azure AD Identifier, and 3. Logout URL. See below for how these values translate in ASA terms.
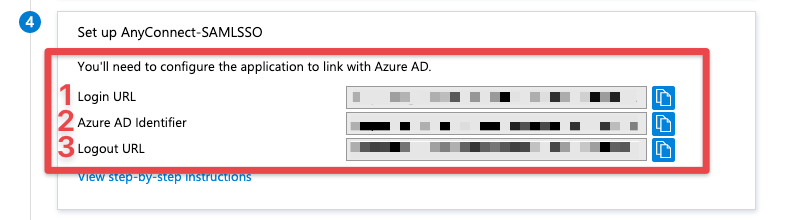
Definitions
Azure AD Identifier (Azure AD) = IDP Entity ID (ASA)
Login URL (Azure AD) = Sign In URL (ASA)
Logout URL (Azure AD) = Sign Out URL (ASA)
Section 2: ASA Configuration
- SSH into your ASA device using your preferred SSH client.
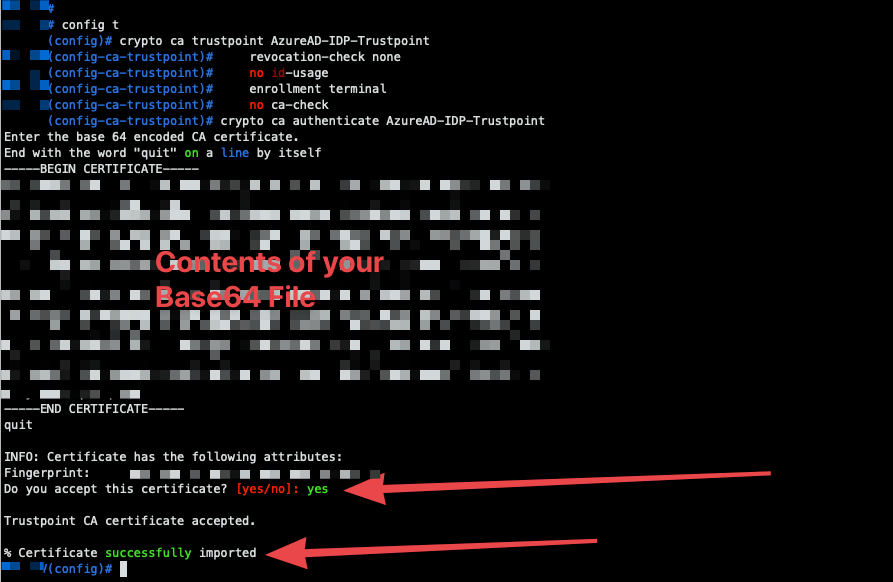
- Below you will find the template commands to configure the CA trustpoint for Azure AD IDP and enroll the Base64 certificate you downloaded in Section 1, Step 5. In this example i named the trustpoint "AzureAD-IDP-Trustpoint" but it can be named to your liking.
config t
crypto ca trustpoint AzureAD-IDP-Trustpoint
    revocation-check none
    no id-usage
    enrollment terminal
    no ca-check
crypto ca authenticate AzureAD-IDP-Trustpoint
-----BEGIN CERTIFICATE-----
~~~PASTE THE CONTENTS OF YOUR BASE64 FILE HERE~~~
-----END CERTIFICATE-----
quit
- Copy the commands above to your favorite text editor, so that you can paste in the contents of your Azure AD Base64 cert. Once you paste in your cert, it should look something like this:
config t
crypto ca trustpoint AzureAD-IDP-Trustpoint
    revocation-check none
    no id-usage
    enrollment terminal
    no ca-check
crypto ca authenticate AzureAD-IDP-Trustpoint
-----BEGIN CERTIFICATE-----
&8OHhbNmtT9za@1FdAAAibGiZV55$@TpvLm2ZoPC55gC3YgO%R4lI4$THISISAFAKECERTm%Hqlm
tVmPT5$g3l3OmAmC11L2FhSrQA*uJl90JEw0hxip@@qLKTHISISAFAKECERTm*7bO8r*7vE&Lap8W546$Lf1MGKOkBNIOKICAf5B0Z!gF*HTHISISAFAKECERTafjGbl$7ddNsRuNzQVWFqgJpSXR^atO#^%t8mUTHISISAFAKECERTe9GhVyroMY87F%jCV#uyLMTtYibF0Bp#aoJ1pX#mocxl1OQEFzYrkZ%nQ%$kl8v28*4NO2C8C6QJWqUJDvy4Pojw&abTjg3t^CGgvY##6979D
-----END CERTIFICATE-----
quit
- After filling in your certificate information, copy the whole block of commands and paste into your SSH client. Accept the certificate and make sure that it successfully installs.
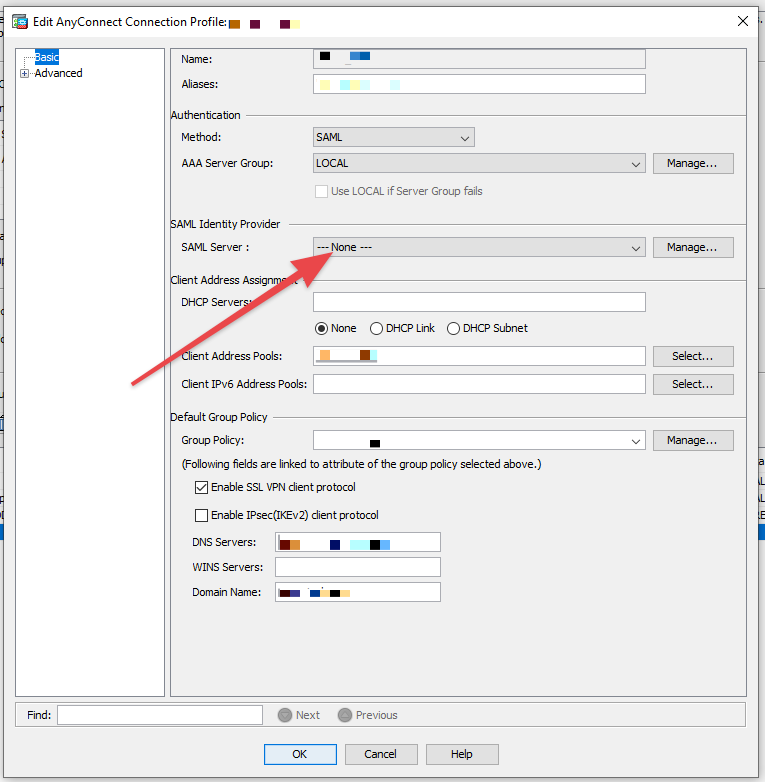
- Next we will configure the SAML IDP provider. You will need to have ready the information from Section 1, Step 6. In the block below, "///xxx///" denotes information you must fill in.
webvpn
  saml idp ///AZURE AD IDENTIFIER LINK///
  url sign-in ///AZURE AD LOGIN URL////
  url sign-out ///AZURE AD LOGOUT URL////
  trustpoint idp ///TRUSTPOINT NAME CONFIGURED IN STEPS 1-4///
  trustpoint sp ///NAME OF YOUR EXISTING EXTERNAL TRUSTPOINT///
  no force re-authentication
  no signature
  base-url ///YOUR ANYCONNECT VPN URL///
- Copy the commands above to your favorite text editor, so that you can paste in the information from your Azure AD application. Once you paste in your information, the command block look something like this:
webvpn
  saml idp https://sts.windows.net/xxxxxx-xxxx-xxxx-xxxx-xxxxxxxxx/
  url sign-in https://login.microsoftonline.com/xxxxxx-xxxx-xxxx-xxxx-xxxxxxxxx/saml2
  url sign-out https://login.microsoftonline.com/common/wsfederation?wa=wsignout1.0
  trustpoint idp AzureAD-IDP-Trustpoint
  trustpoint sp VPN_Trustpoint
  no force re-authentication
  no signature
  base-url https://vpn.mycompany.com
- After filling in your Azure AD application information, copy the whole block of commands and paste into your SSH client. This will create the SAML Identity provider on the ASA.
- Next you will need to apply the SAML IDP to your existing VPN tunnel group. Creating a tunnel group is not covered in this guide. Copy the code block below and fill in your information.
tunnel-group ///YOUR EXISTING VPN TUNNEL GROUP/// webvpn-attributes
 authentication saml
 saml identity-provider ///AZURE AD IDENTIFIER LINK///
- Once you fill in with your information, it should look something like this:
tunnel-group VPN_TunnelGroup webvpn-attributes
 authentication saml
 saml identity-provider https://sts.windows.net/xxxxxx-xxxx-xxxx-xxxx-xxxxxxxxx/
- After filling in your SAML IDP information, copy the whole block of commands and paste into your SSH client. This will configure the specified tunnel group to utilize SAML authentication and use your SAML IDP created in steps 5-7 as the source.
- Run the following command to save your configuration changes on the ASA:
write memory
Section 3: SAML Metadata
Now that we completed the required configurations on the ASA, we must retrieve the SAML metadata and input this information back into the Azure AD application.
- To access your metadata, fill in your fields and then copy the URL below:
https://yourvpnurl.com/saml/sp/metadata/TUNNELGROUPNAME
For example, using our sample data the link would be:
https://vpn.mycompany.com/saml/sp/metadata/VPN_TunnelGroup
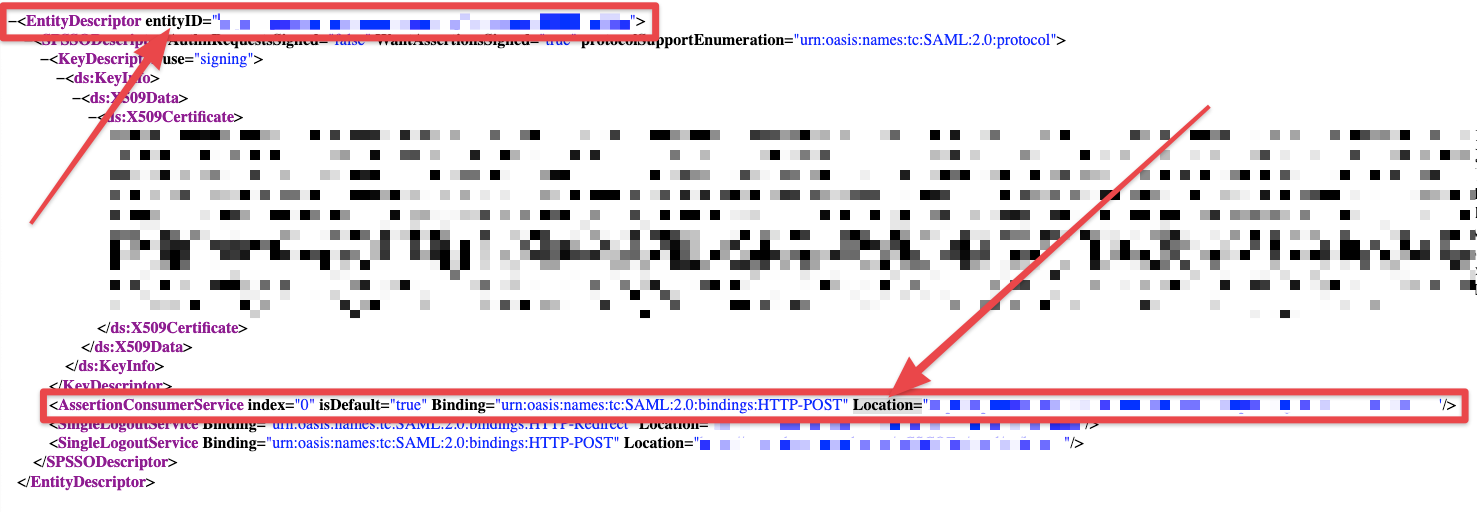
- Browse to your respective link and your SAML metadata XML should load.
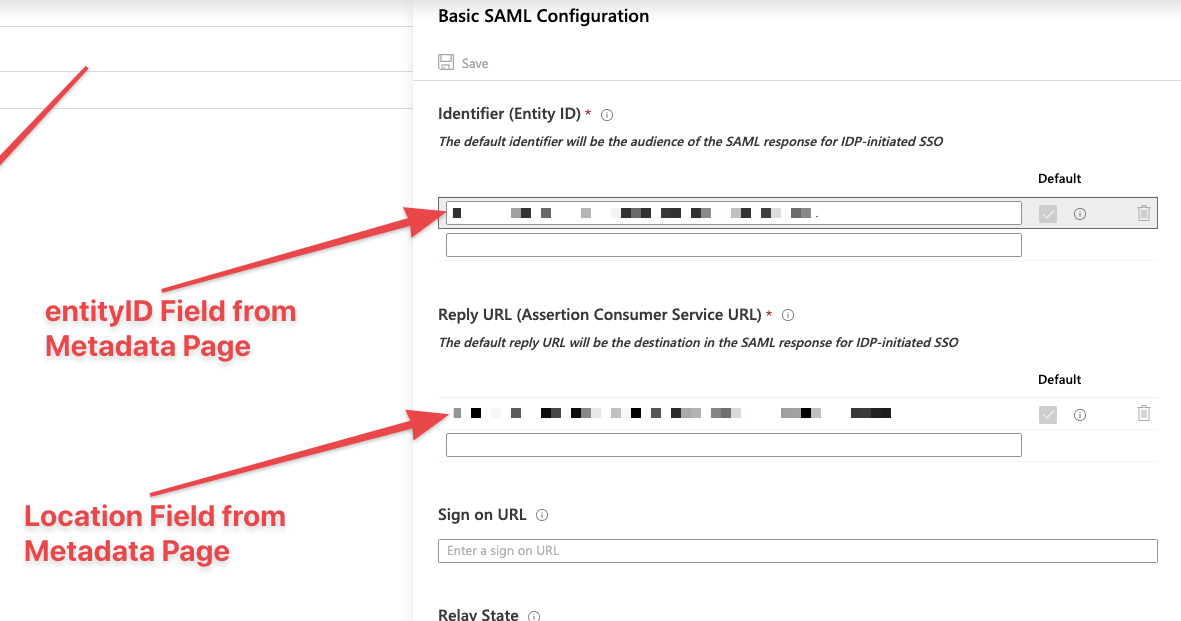
- On this page locate the "AssertionCustomerService" element and in this element look for the "Location" field. This will be added on the Azure AD application as the reply URL. On the metadata page, also locate the entityID at the top. This will also need to be entered on the Azure AD application settings.
- On the Azure AD portal, open your enterprise application and go to the "Single sign-on" settings page. On box 1 "Basic SAML Configuration" press the pencil icon in the top right to edit.
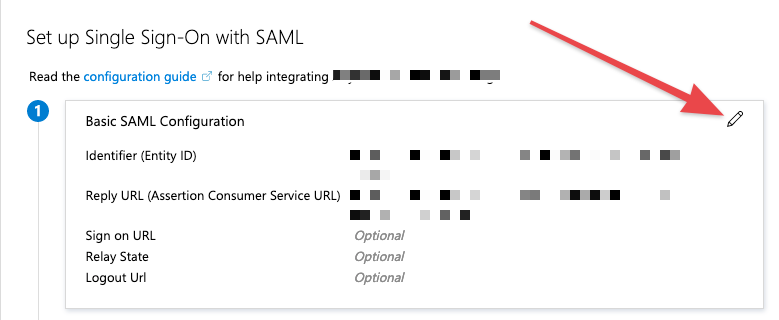
- With the data copied from your ASA metdata page, fill in the Identifier (Entity ID) and Reply URL (Assertion Customer Service URL) fields. Press save when done.
Section 4: Users and Groups
Now that you have the ASA configured and the Azure AD SAML application set up, you have to specific which users/groups can access that application and in turn, access your VPN. Alternatively, you can disable user/group assignment, which would allow all users in your Azure Active Directory to access the application.
Enable Sign In for the Application:
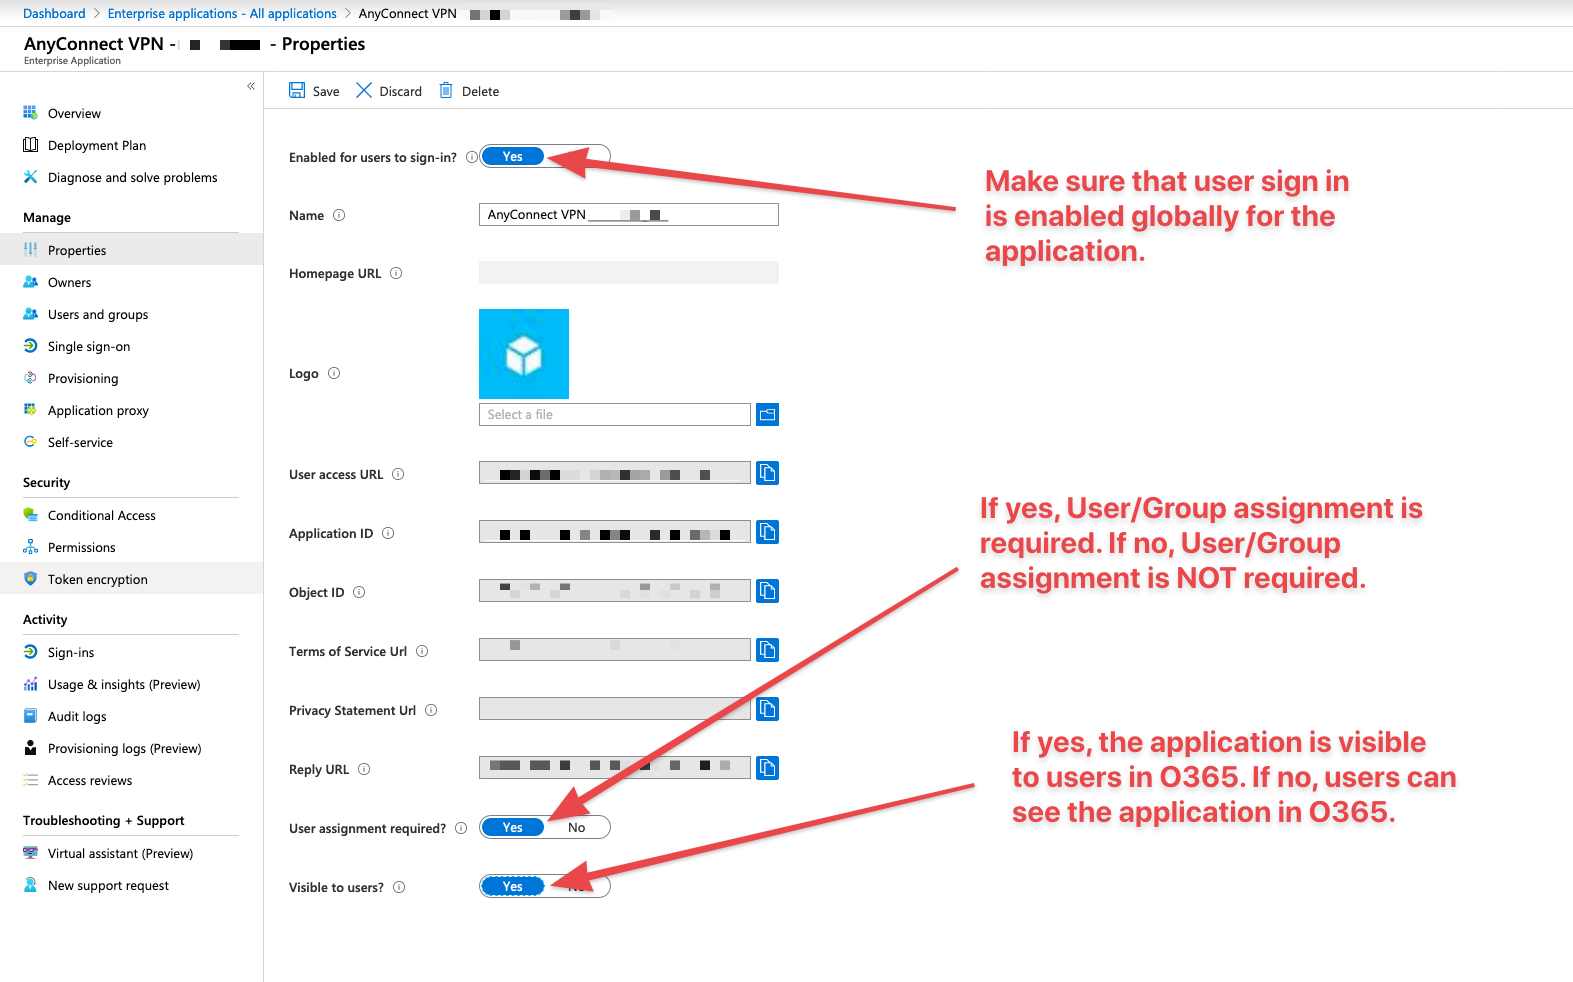
In Azure AD, browse to your SAML application and go to the "Properties" tab. Ensure that "Enabled for users to sign-in?" is set to "Yes". This setting ensures that sign in is globally enabled, wether you are looking to restrict access to certain users/groups or permit all users.
To Permit Certain Users/Groups:
If you would like to assign specific users/groups to access the SAML application, make sure that "User assignment required?" is set to "Yes".
Once enabled, be sure that you assign your users (free Azure AD) and/or Groups (premium Azure Ad) on the "Users and groups" settings tab.
To Allow All Users/Groups:
If you would like to allow all users/groups in your Azure Active Directory forest to access the SAML application, make sure that "User assignment required?" is set to "No".
Section 5: Azure AD Conditional Access
OPTIONAL SECTION
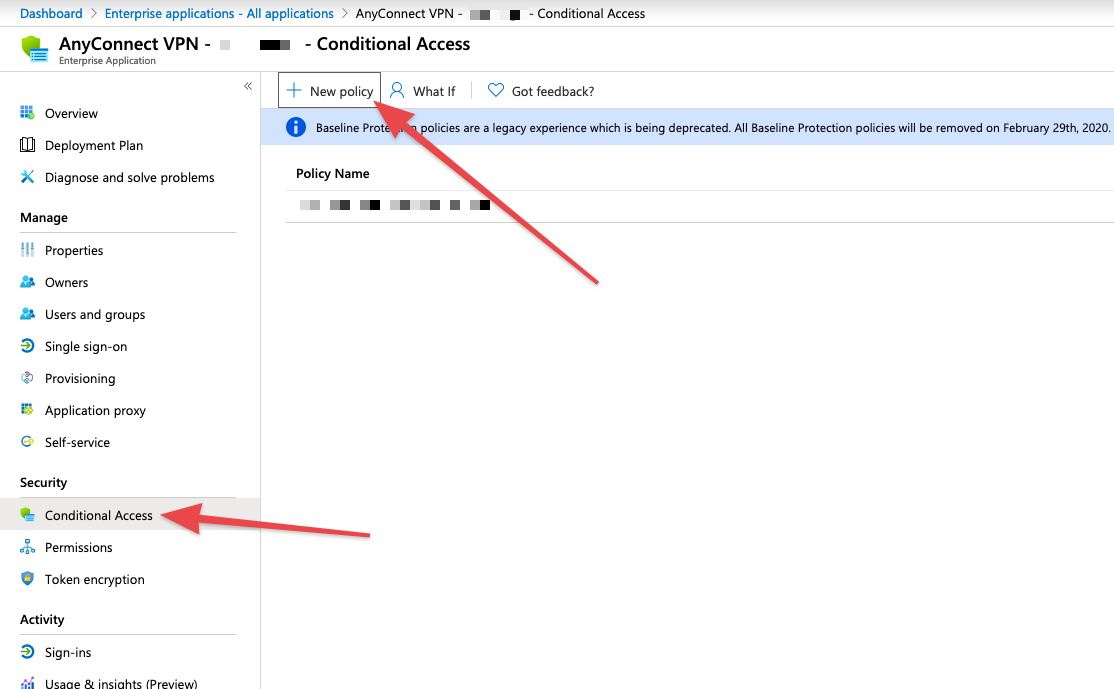
If you have Azure AD Premium, you can utilize conditional access policies to enforce certain controls to permit/deny user access.
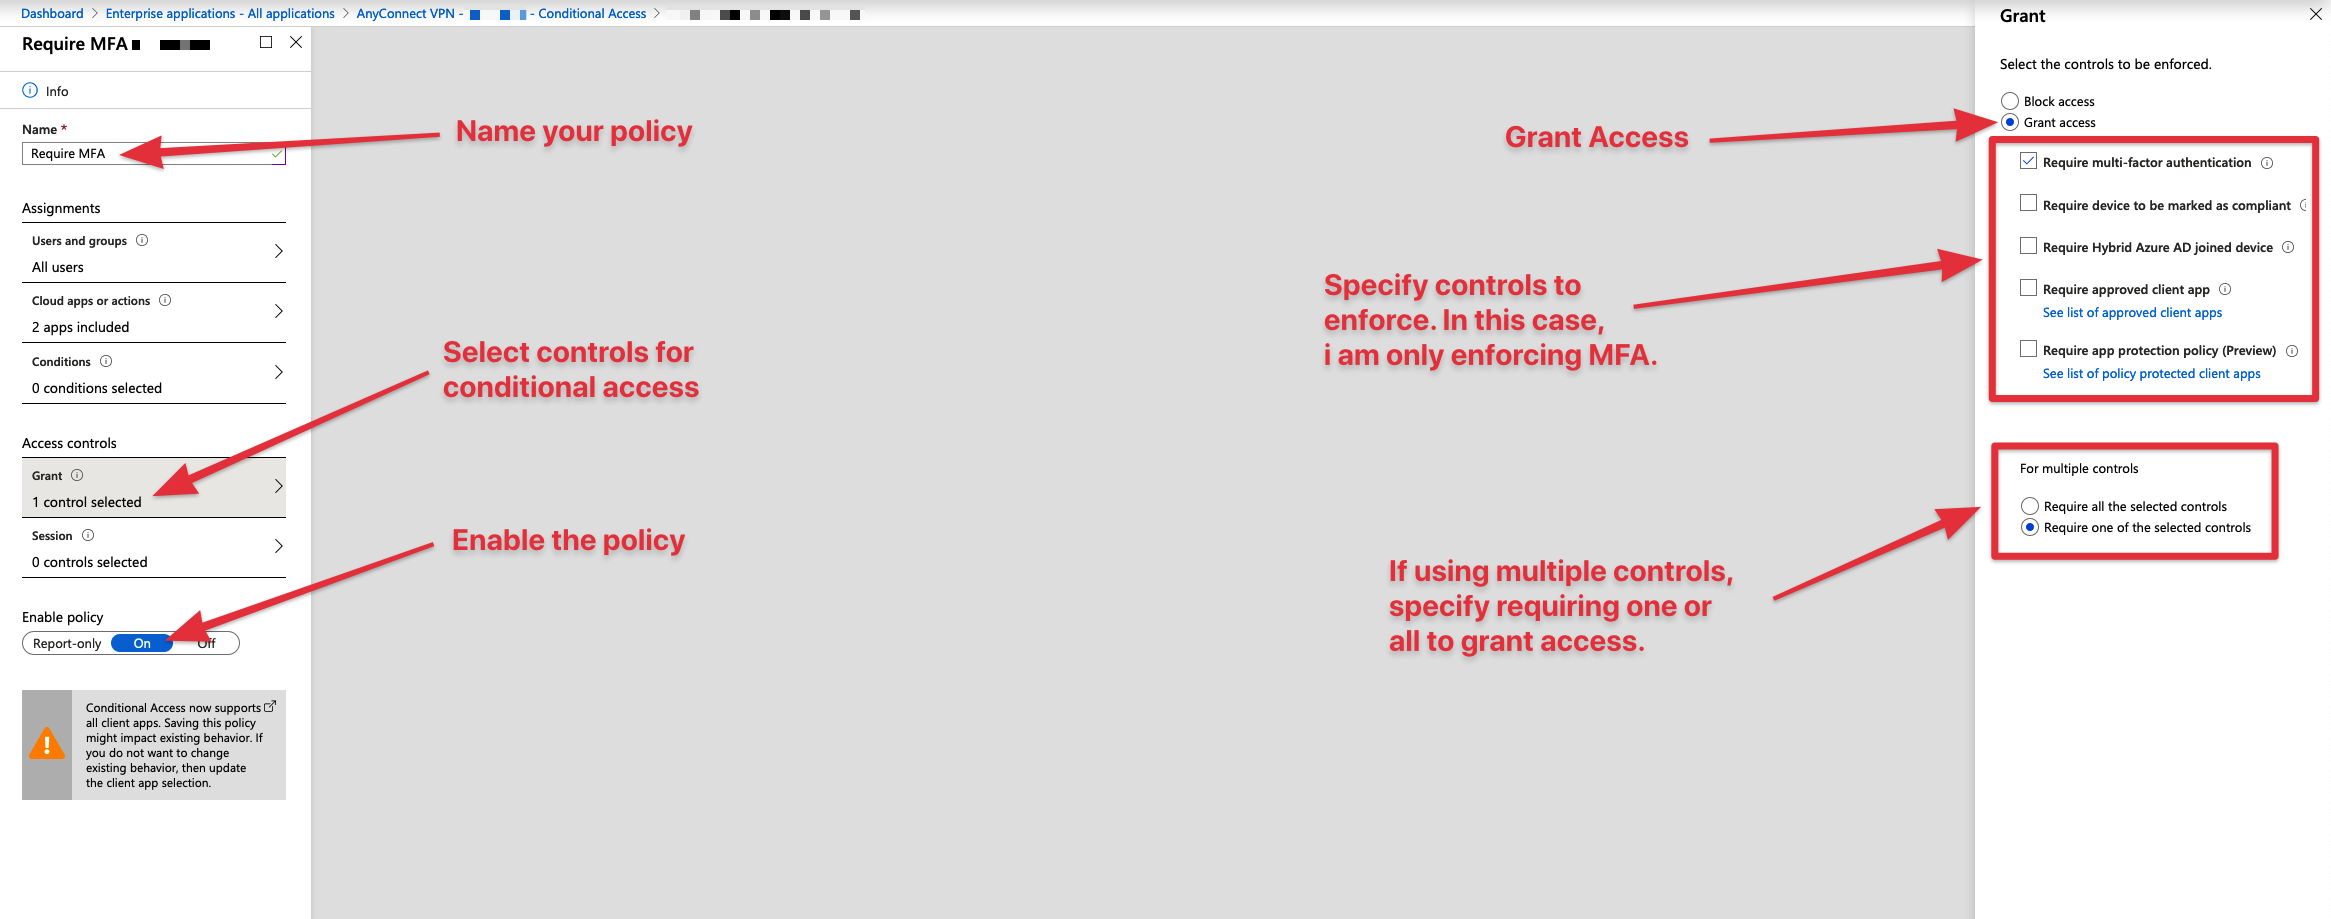
- On your SAML application in Azure AD, select the "Conditional Access" settings pane and select "New Policy".
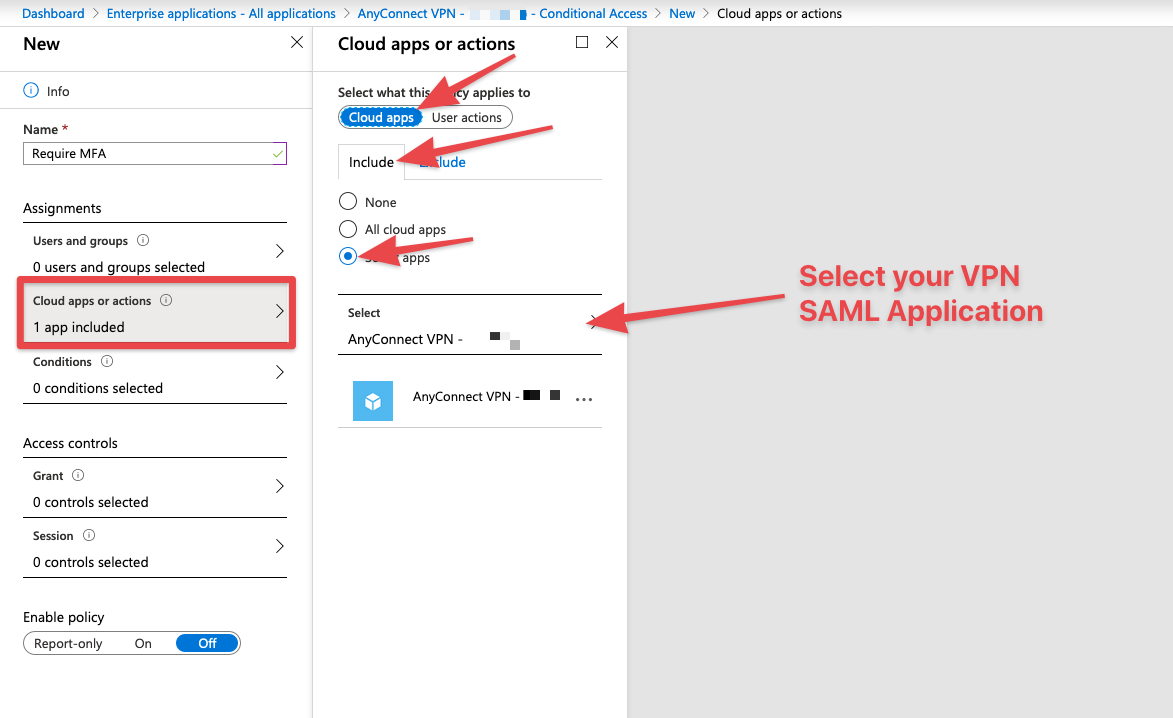
- On the "new" menu, select "Cloud apps or actions", select "Cloud apps", then "Include", then select "Select apps" and finally under the select menu, search for your SAML application.
-
Next select "Grant", select "Grant Access" and then select the required controls for users trying to authenticate. In this case i am only requiring users to pass an MFA challenge. If using multiple controls, make sure to choose whether or not you want to require one or all of them.
Lastly, make sure your policy is enabled in the bottom left and provide a name for it in the top left. Once satisfied, press the blue save button in the bottom left of your screen.
Wrapping Things Up
Forced Re-Authentication
- OPTIONAL: To force users to reauthenticate every single time they connect to VPN, enter in the following commands (replace /// with your information):
config t
webvpn
saml idp ///AZURE AD IDENTIFIER LINK///
force reauthentication
quit
- With forced reauthentication, credential caching will be ignored and users will be forced to re-authenticate with their credentials + conditional access (if enabled) every time they connect to VPN.
Important to know:
- If you make any changes to the SAML IDP (like we did above) you must remove it from any tunnel groups where it is currently applied and re-apply in order for your changes to take effect.
config t
tunnel-group ///YOUR VPN TUNNEL GROUP/// webvpn-attributes
no saml idp ///AZURE AD IDENTIFIER LINK///
saml idp ///AZURE AD IDENTIFIER LINK///
quit
wr
Congratulations!
And thats it! You should now be able to connect to your AnyConnect VPN using a clean, modern, web based authentication via Azure AD! Please feel free to share any comments below and if you are experiencing issues, see the troubleshooting guide below.
Thanks for reading!
Jason @ Byte of Security
Common Issues + Fixes
1. When connecting to VPN, the SAML authentication window opens up in an external web browser or does not appear at all
If you are using SAML authentication with AnyConnect 4.4 or 4.5 and you deploy ASA version 9.7.1.24, 9.8.2.28, or 9.9.2.1 (Release Date: 18-APR-2018), the defaulted SAML behavior is the embedded browser, which is not supported on AnyConnect 4.4 and 4.5.
Options to Address the issue:
- Enable the saml external-browser command in tunnel group configuration in order for AnyConnect 4.4 and 4.5 clients to authenticate with SAML using the external (native) browser.
- Update your AnyConnect software version to 4.6 or above.
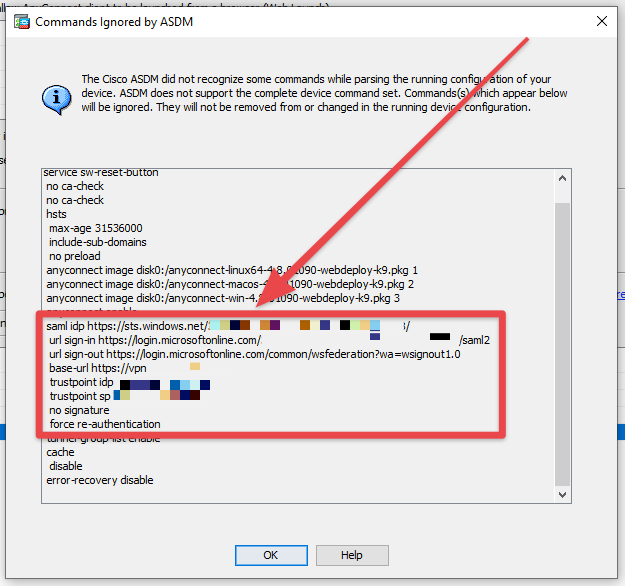
2. When looking at your tunnel group on ASDM, the SAML section is blank
- On the ASDM toolbar, select "Tools" and then "Show Commands Ignored by ASDM on Device".
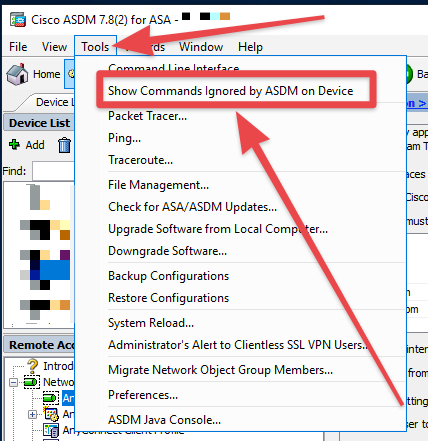
- In this section you should see your SAML IDP configuration. If so, this means that ASDM is ignoring these commands and not displaying them on the GUI. Not to worry, nothing is wrong and these commands are still applied to your device configuration.
3. Authentication failed due to problem retrieving the single sign-on cookie.
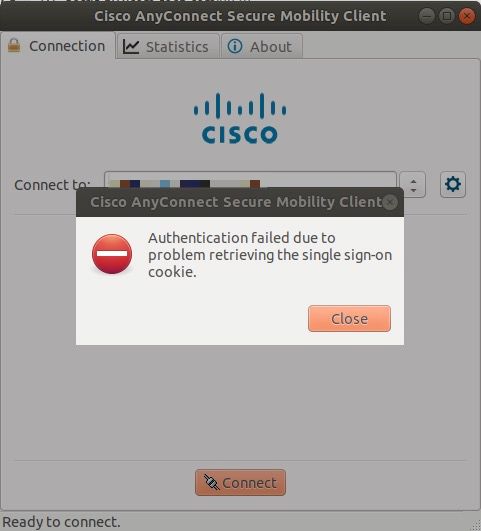
This error will typically error when changes have been made to the SAML IDP, but the IDP has not been removed and reapplied to the tunnel group. To remediate this issue, you will remove and reapply the SAML IDP to your tunnel group using the command set below:
config t
tunnel-group ///YOUR VPN TUNNEL GROUP/// webvpn-attributes
no saml idp ///AZURE AD IDENTIFIER LINK///
saml idp ///AZURE AD IDENTIFIER LINK///
quit
wr
On some extra stubborn ASAs, i have seen cases where removing and reapplying does not fix the issue. At this point, i would recommend a reboot of your ASA device. Make sure to save your configuration before reloading!
wr
reload
Once the ASA reboots, test again and you should be able to connect.

View Comments